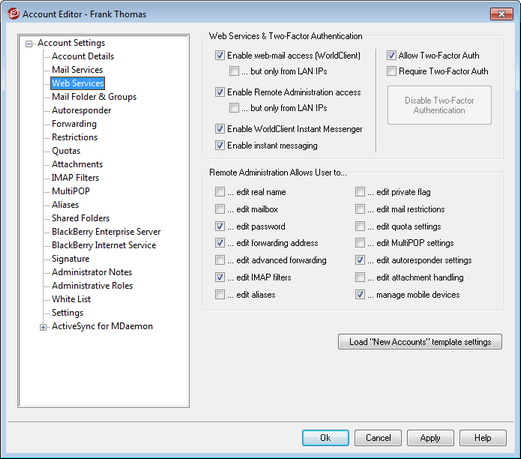
Web Services

Contents
Web Service
Enable web-mail access (WorldClient)
Enable this checkbox if you want the account to be able to access WorldClient, which enables users to access their email, calendars, and other features using a web browser.
...but only from LAN IPs
Check this box if you wish to allow the account access to WorldClient only when connecting from a LAN IP address.
Enable Remote Administration access
Check this box if you wish to grant the user permission to modify his or her account settings via Remote Administration. The user will only be able to edit those settings that you designate below.
When this feature is enabled and the Remote Administration server is active, the user will be able to log in to Remote Administration by pointing a browser to the designated MDaemon domain and port assigned to Remote Administration (e.g. http://example.com:1000). He will first be presented with a sign-in screen and then a screen that contains the settings that he has been given permission to edit. All he needs to do is edit whatever settings he chooses and then click the Save changes button. He can then sign out and close the browser. If he has access to WorldClient then he can also access Remote Administration from the Advanced Options menu within WorldClient.
If the user is a Global or Domain Administrator (designated on the Account Editor's Administrative Roles screen) he will see a different screen after he logs in to Remote Administration.
...but only from LAN IPs
Check this box if you wish to allow the account access to Remote Administration only when connecting from a LAN IP address.
Enable WorldClient Instant Messenger
Click this box if you wish to enable WCIM support for this account.
Enable Instant Messaging
When WCIM support is enabled for the account, click this option is you also wish to enable support for WCIM's instant messaging system. When this checkbox is cleared, you will be able to access WCIM's other features, but not instant messaging.
Two-Factor Authentication
MDaemon supports Two-Factor Authentication (2FA) for users signing into WorldClient or MDaemon's Remote Administration web-interface. Accounts that sign into WorldClient via HTTPS can activate Two-Factor Authentication for that account on the Options » Security screen in WorldClient. From then on the user must enter a verification code when signing into WorldClient or Remote Administration. The code is obtained at sign-in from an authenticator app installed on the user's mobile device or tablet. This feature is designed for any client that supports Google Authenticator. See the WorldClient help file for more information on setting up 2FA for an account.
Allow Two-Factor Authentication
By default new accounts are allowed to setup and use WorldClient's Two-Factor Authentication (2FA) feature. Clear this checkbox if you so not wish to allow this account to use 2FA.
Require Two-Factor Authentication
Enable this option if you wish to force the account to use Two-Factor Authentication (2FA) when signing in to WorldClient. If 2FA hasn't yet been configured for the account, the next time the account signs in to WorldClient the user will be redirected to a page to set it up. See the WorldClient help file for more information on setting up 2FA for an account.
Disable Two-Factor Authentication
Click this button if you need to disable Two-Factor Authentication for the account. This could be necessary if, for example, the user loses his device and can't otherwise access his authenticator data.
Remote Administration Allows User to...
...edit real name
Enabling this feature will allow the user to modify the account's First and last name setting.
...edit mailbox
Enabling this feature will allow the user to modify the account's Mailbox name.
|
Because the Mailbox name is part of the account's email address, which is the unique identifier and login value for the account, changing it means that the user will be changing his or her actual email address. This could result in any future messages directed to the old address being rejected, deleted, or the like. |

...edit password
Click this checkbox if you wish to allow the user to modify the account's Mailbox password. For more on password requirements, see: Passwords.
...edit forwarding address
When this feature is enabled, the user will be able to modify the forwarding address settings.
...edit advanced forwarding
When this feature is enabled, the user will be able to modify the Advanced Forwarding Settings.
...edit IMAP filters
Use this control to enable the user to create and manage his own IMAP Filters. This feature is only available in MDaemon PRO.
...edit aliases
Enable this option if you wish to allow the account holder to use Remote Administration to edit Aliases associated with his or her account.
...edit private flag
This option governs whether or not the user will be permitted to use Remote Administration to edit the "Account is private" option located on the Account Editor's Settings screen.
...edit mail restrictions
This checkbox controls whether or not the account will be able to edit the Inbound/Outbound mail restriction, located on the Restrictions screen.
...edit quota settings
Click this checkbox if you wish to allow the account to modify the Quota settings.
...edit MultiPOP settings
Click this checkbox if you wish to give the account permission to add new MultiPOP entries and to enable/disable MultiPOP collection for those entries.
...edit autoresponder settings
Click this checkbox if you wish to give the user permission to add, edit, or delete Autoresponders for his account.
...edit attachment handling
Check this box if you wish to allow the user to edit the account's attachment handling options, located on the Attachments screen.
...manage mobile device
Click this option if you wish to allow the account holder to use Remote Administration to manage his or her device-specific settings, such as for BlackBerry and ActiveSync devices.
Load "New Accounts" template settings
Click this button to return the settings on this screen to the default values designated on the Web Services screen of the New Accounts template.
See: