Group Properties

Contents
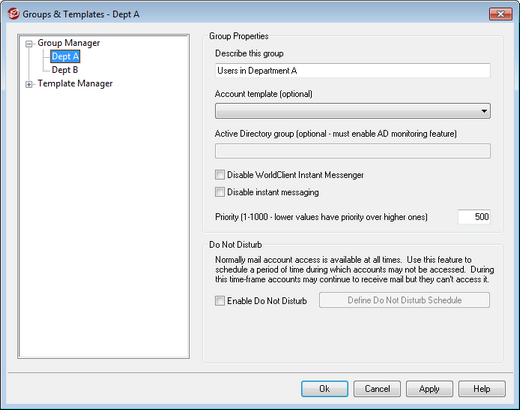
The Group Properties screen (Accounts » Groups & Templates... » [group name]) is used to configure the settings for each group you have created using the Group Manager. To open Group Properties from the Group Manager, double-click the group you wish to edit, or click the name of the group in the left pane. On this screen you can assign an Account Template to a group, allowing you to control a variety of account settings for group members. You can also link the group to an Active Directory group, control whether or not group members have access to WorldClient Instant Messenger (WCIM) and instant messaging, and set a priority level for the group. To control group membership, use the Group Manager and Mail Folder & Groups screen on the Account Editor.
Group Properties
Describe this group
Enter a description of the group here, for your own reference. This information is typically entered when you create the group but can be edited from this screen at any time.
Account template (optional)
If you have created an Account Template that you would like to use to control some of the account settings for group members, use this drop-down list to select the desired template. When an account template is linked to a group, any category of account settings designated on Template Properties will be used for all accounts belonging to the group. The template will be used to control those settings rather than using the individual account settings on the Account Editor. If an account is removed from a group that was controlling its account settings, the settings will revert to the values designated by the New Accounts template.
If an account belongs to multiple groups linked to different templates, then all of the templates will be used wherever there are no conflicts in the designated Template Properties. If multiple templates are set to control the same properties, then the first template listed is the one that will be used.
Active Directory group (optional - requires AD monitoring)
Use this option if you wish to link the group to a specific Active Directory group. Members of the Active Directory group will added to the account group automatically. But for this to work you must be using the Active Directory Monitoring feature.
You can map any Active Directory attribute you want to use as a trigger for adding accounts to Groups, although the "memberOf" attribute will most likely be the one to use. You can configure this by editing ActiveDS.dat in notepad. This feature is disabled by default. To enable it, edit ActiveDS.dat and specify which attribute to use for your group trigger, or uncomment the "Groups=%memberOf%" line in ActiveDS.dat to use it.
Disable WorldClient Instant Messenger
Click this box if you wish to disable WCIM support for all members of the group.
Disable Instant Messaging
Click this box if you wish to allow support for WCIM but not its Instant Messaging feature.
Priority (1-1000 - lower values have priority over higher ones)
Use this option to set a priority level (1-1000) for your groups, which allows accounts to be members of multiple groups and avoid possible conflicts between group settings. For example, when an account is a member of multiple groups that each have a linked account template controlling the same settings, the settings for the group with the first Priority will be used. In other words, a group with a Priority value of "1" will be over a group with a value of "10". When there is no conflict the settings for each group are collectively applied. In the case of a tie the first group found wins. When an account is removed from a group linked an account template, the account settings previously controlled by the account template will change to the account settings designated by the next Priority group. If there isn't another group controlling those settings, then they will revert to settings designated by the New Accounts template.
Do Not Disturb
Use the Do Not Disturb feature to schedule a time frame during which an account may not send mail or be accessed by its users. Access during a Do Not Disturb period is not allowed and returns an appropriate error response to IMAP, POP, SMTP, ActiveSync, and WorldClient access requests. MDaemon will still accept incoming mail for accounts in this state, but those accounts may not send mail or be accessed by mail clients.
To apply Do Not Disturb to one or more accounts:
1. Click Enable Do Not Disturb.
2. Click Define Do Not Disturb Schedule.
3. Set the start/end dates, the start/end times, and the days of the week to use it.
4. Click Ok.
5. Use the Group Manager to assign any accounts to this group that you wish to use it.
See: